Adding "stuff" to the Menu Section
In this section we are going to take a look at the Menu...the bar of links that is on the left side of the screen. In my template class it looks like this:

The Menu section can be customized with links of your choice. While it is not as flexible as what you can do in the Content section, you can put quite a lot here. These items remain visible to the user all the time, so we want to put links here that assist with navigation to the major components of the class.
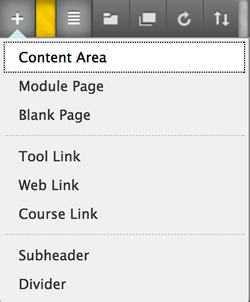
When you are in "Edit On" mode you will see a plus "+" sign at the top of the menu. Pressing this button will reveal the options that you have to add elements to the menu:

As you can see, you can create links to a "Content Area", "Module Page", "Blank Page", "Tool Link", "Web Link", and/or a "Course Link"...you can also create sub headings and dividers. (Note: in the sample menu above you can see that I have created sub headers such as "Communication" and "Course Content" and the divider lines can be seen as well.) Let's go through each one of these so we know what they are.
Content Area
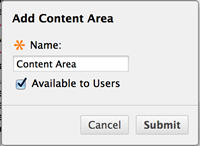
If you select Content Area you will be asked to name it and check if you would like to make it visible in the class (you can change the names and visibility easily at any time.)

Selecting Submit will add a Content Area titled "Content Area" to the bottom of the menu. I can MOVE the link up and down the menu simply by clicking and holding the menu item and dragging it up and down the menu.
Clicking on the new link will bring up the Content Area which provides with the opportunity to add all kinds of links and material.

Content areas can be used to provide major organizational structure for your course...you can organize all your lesson or weekly materials in a content area...or even create a single place for all communication (such as email, messages, and discussions).
Module Page
A Module Page allows you to add specific tools to your course...you have already learned about Module Pages in a previous lesson (Content Folders, Learning Modules, and Module Pages)
You may choose to have different module pages with different titles in your class if, for instance, you wanted to have a "Check what is New" module page and a "Review Textbook Publisher Content" module page...by creating a link in the menu to these types of items you provide your students with continual access to them.
Blank Page
A Blank Page menu item will allow you to create a page (using the HTML editing tools in BB). You might use this tool to create a Welcome Page to your class or to create a page about a specific assignment or expectation, or even a little biography of you!
Tool Links, Web Links, and Course Links
These are somewhat self explanatory. Tool Links will provide direct access to tools such as Assessments, Email, Messages, and Discussions
Web Links will provide access to a URL on the Web
Course Links will link directly to other pages in the class that have already been created.
Note about Course Links: I have discovered that if you want to create a Course Link, such as a direct link to an existing document, lesson plan, assessment, etc...the item that you are linking to has to remain visible somewhere else in the course. For example: I create the documents in my classes using an HTML editor outside of BB and then I upload those files to the course. I wanted to create a link on the menu to my Calendar (which is just a list of due dates) so that students could access this quickly. I had to place that Calendar document somewhere in the class FIRST and then create a link to it for the menu...if I then hid the document the link from the menu would not work. You will need to experiment with this to see how it works best for you! |
Renaming/Hiding/Deleting a Link on the Menu
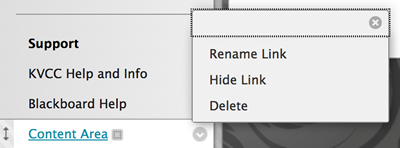
To edit an item from the menu you simply click the arrow which appears on the right of the title (when you are in Edit On mode) and select from the options.
